

Search horse costume ideas and you get photographs. Hundreds of them, on Pinterest and in roundups thirty entries long, every one captioned and not one of them telling you how the thing was made.
That is the gap this guide fills. Below are ten horse costume ideas with the build written out step by step, what each one actually costs in materials at today’s prices, how many evenings it takes, and where to buy the parts. Every costume is shown on a real horse, almost all of them in hand, because that is how most of them should be worn.
One thing before the list, because it decides whether a costume is a good idea or a trip to the vet.
What makes a horse costume safe?
A costume is safe when the horse can see normally, cannot get a leg caught in it, and can be stripped off in one motion.
The vision part is the one most guides skip, and it is worth understanding rather than just obeying. A horse has a field of view of roughly 350 degrees, but only about 65 degrees of that is binocular, the narrow triangle in front of the face where it can judge depth. The remaining 285 degrees is monocular, which detects movement well and distance badly.
That leaves two blind spots. One sits directly behind the horse, extending over the back and past the tail. The other is a cone in front of the nose that comes to a point around 90 to 120 cm, three to four feet, ahead of the horse.
Read that again with a costume in mind. Anything draped over the face narrows the one part of the visual field that judges depth. Anything that flaps near the flank moves in the part of the field that is best at detecting motion and worst at identifying it. You are not dealing with a disobedient animal when it reacts, you are dealing with one that genuinely cannot resolve what just moved.
Three rules follow, and every costume below is built to respect them.
Nothing over the eyes or the muzzle. Hoods and masks that cover the face are the single most common mistake in bought costumes. Every build here leaves both eyes and the whole muzzle completely clear.
Nothing below the knee, nothing dragging where a hoof can find it. A costume that can be stepped on is a costume that pulls tight when it is stepped on.
Everything comes off in one pull. Breakaway ties and hook and loop, no knots you have to pick at in a hurry.
And test it at home first, in hand, in an enclosed space, before any event. If the horse says no after two sessions, pick a costume that lives on the browband instead. There is no rule that says a costume needs a rider in it.
The ten costumes at a glance
| # | Costume | Build time | Materials cost | Difficulty |
|---|---|---|---|---|
| 1 | Skeleton | 2 to 3 hours | $28 | Easy |
| 2 | Unicorn | 90 minutes | $40 | Easy |
| 3 | Pumpkin | 4 to 5 hours | $38 | Medium |
| 4 | Ghost | 2 hours | $20 | Easy |
| 5 | Medieval knight | 8 to 10 hours | $75 | Hard |
| 6 | Lion | 4 hours | $60 | Medium |
| 7 | Dinosaur | 4 hours | $40 | Medium |
| 8 | Dragon | 12 to 15 hours | $85 | Hard |
| 9 | Racehorse | 4 hours | $45 | Medium |
| 10 | Headless horseman | 5 hours | $50 | Medium |
Costs are materials only, calculated from current retail prices: craft felt runs $5.50 to $12.25 a yard depending on supplier, anti-pill fleece $5.99 to $17.99 a yard at Joann, and 3M Vetrap about $4.66 a roll in a six pack. They assume you already own a stable rug or cooler to build on, which is the single biggest saving available and the reason the last section of this guide exists.
1. The skeleton
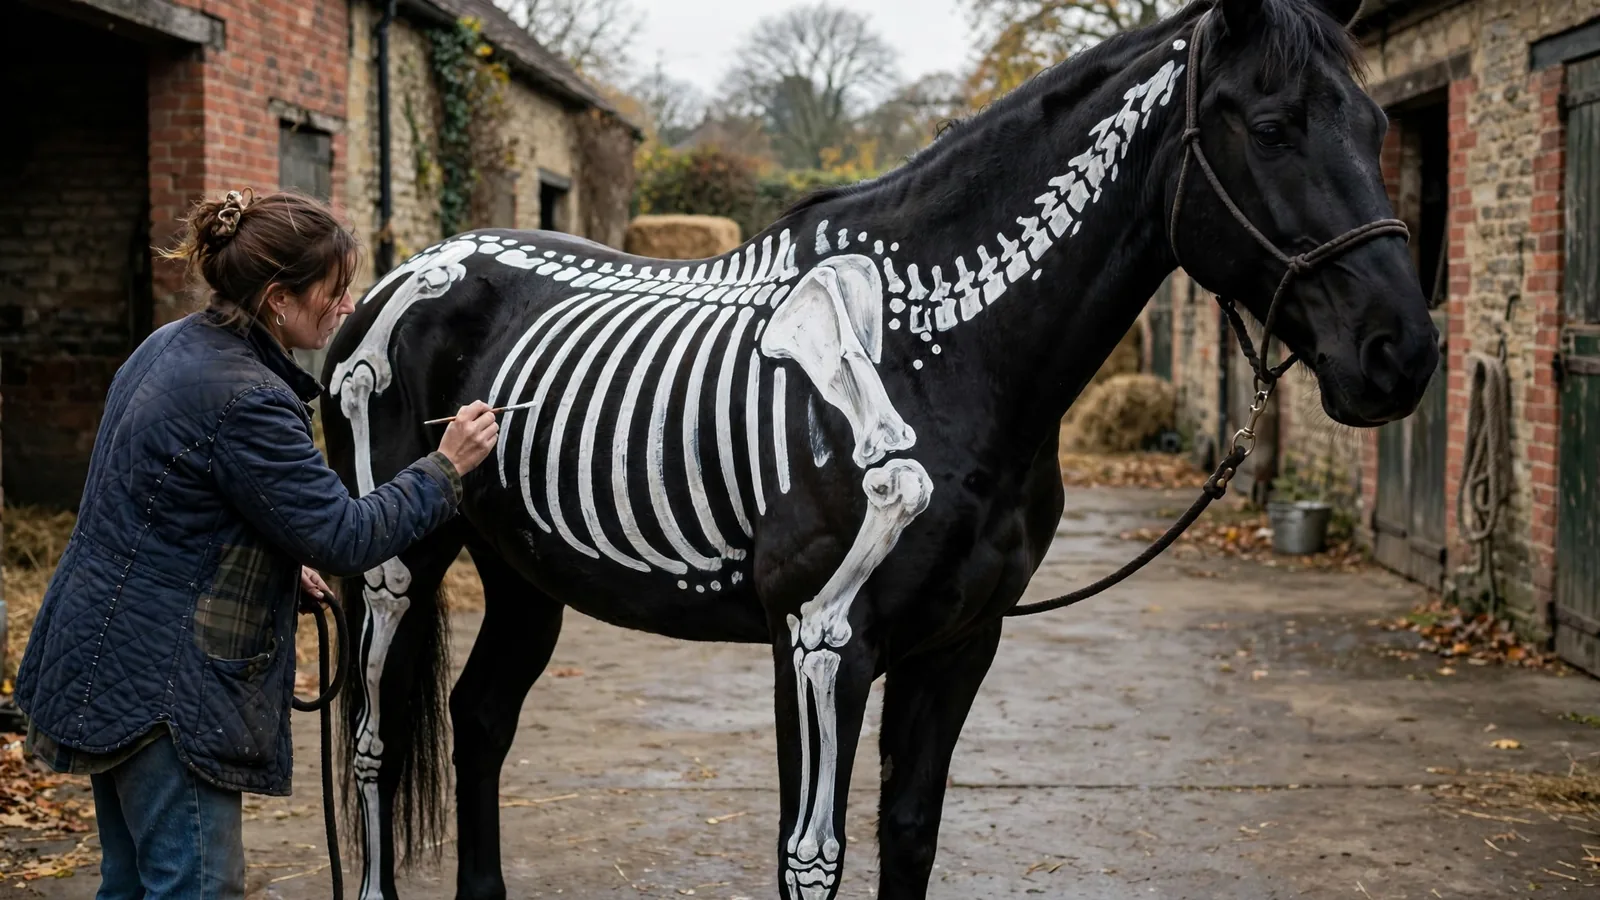
Build time 2 to 3 hours. Materials $28. Easy.
The highest impact for the least skill, and the reason it tops every list. White bones on a dark horse read from across a field and photograph better than anything else here.
You need: white Vetrap or white non-toxic livestock marking paint, a 2 inch brush, and a printed reference photo of an equine skeleton.
Build it:
- Print a side-on equine skeleton diagram. Do not freehand this. The ribs are the part everyone gets wrong, and they are the part people look at.
- Start with the shoulder blade, a broad flat triangle behind the point of the shoulder. Getting this right anchors everything else.
- Work the ribs next, from the spine curving down and back toward the belly. Eight to ten clearly separated ribs reads better than fourteen crowded ones.
- Add the cervical vertebrae as a chain of blocks down the neck, then the pelvis as a wedge over the hip.
- Finish with the leg bones, a single line down each leg with a joint blob at knee, hock and fetlock.
The detail that makes it work: separation. Amateur skeletons fail because the ribs are drawn too close together and merge into a white mass at ten feet. Leave a hand’s width between them.
If you use paint rather than tape, patch test on the shoulder and leave it twenty minutes before committing. Bought equivalent: a full skeleton horse costume listed on Etsy at $395.
2. The unicorn
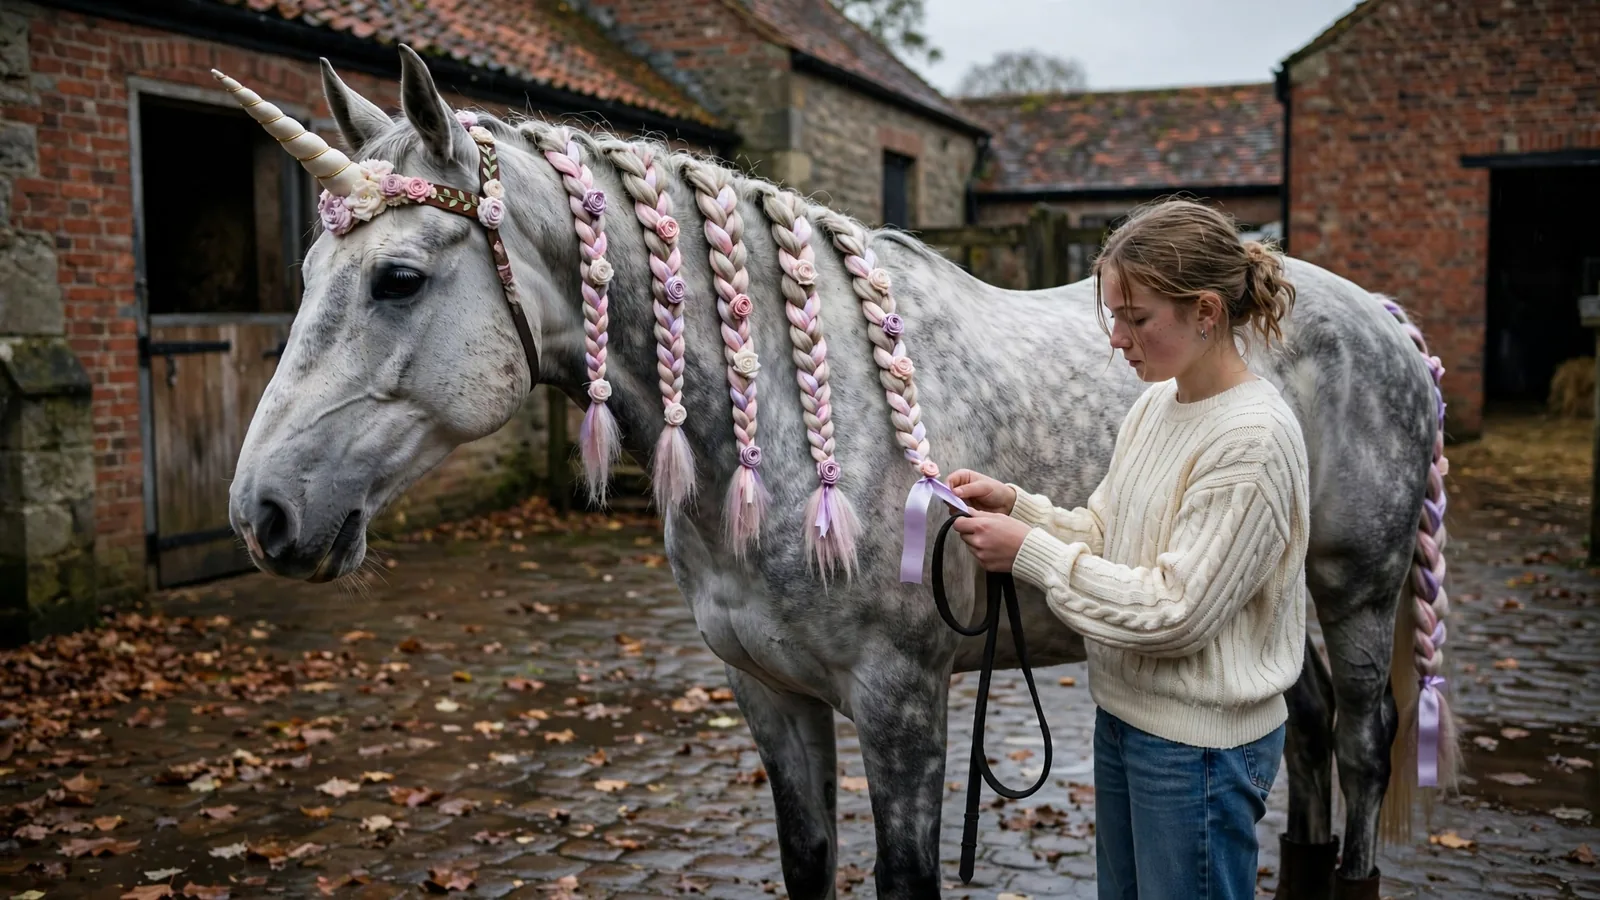
Build time 90 minutes. Materials $40. Easy.
The one costume that works entirely above the neck, which makes it the right choice for a horse who wants nothing to do with rugs.
You need: a spiral horn on a browband mount, ribbon in two shades, small fabric roses, and a needle and thread.
Build it:
- Buy the horn mounted on a browband, not on a halter. Handmade horns run $26 to $38 on Etsy. A browband already sits where the horse expects pressure, which a halter-mounted horn does not.
- Section the mane into eight thick braids rather than many thin ones. Thin braids disappear at distance.
- Plait ribbon in from the top of each braid so it runs right through the whole length, not tied on at the bottom.
- Stitch fabric roses along the braids at irregular intervals. Irregular reads as handmade; evenly spaced reads as shop bought.
- Braid the tail to match and finish with the same ribbon.
The detail that makes it work: ribbon woven through the braid, not tied to it. It is the difference between a costume and a decorated horse.
Skip the glitter gel near the eyes. It migrates.
3. The pumpkin
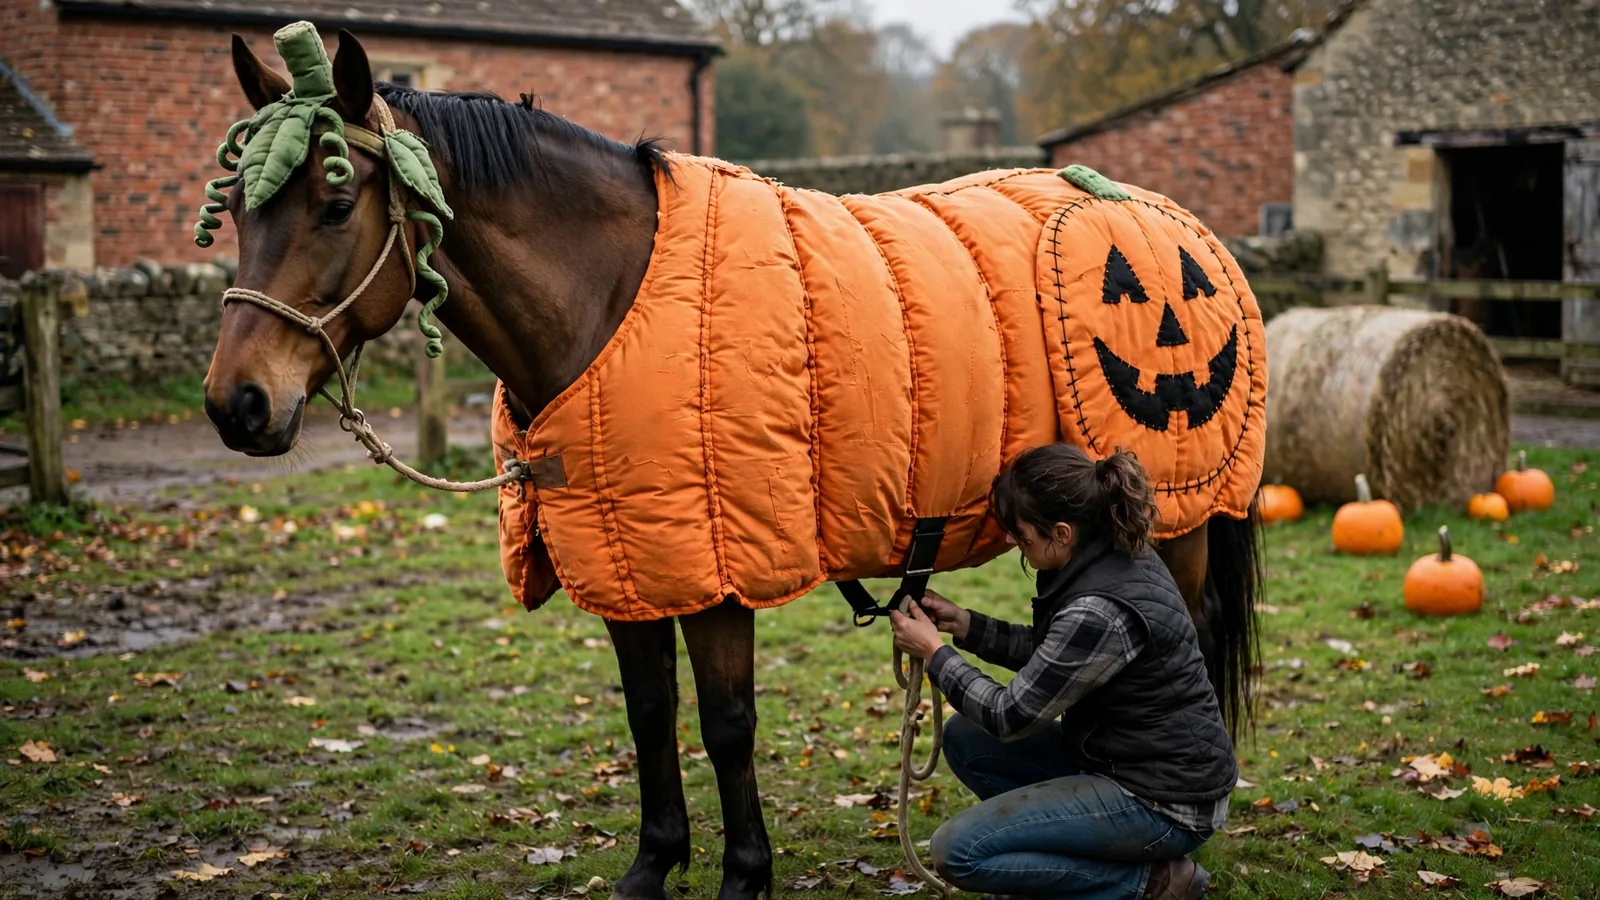
Build time 4 to 5 hours. Materials $38. Medium.
The most recognisable costume on the list and the most forgiving, because a horse who lives in a rug all winter barely notices another one.
You need: 3 yards of orange fleece, half a yard of black felt, a quarter yard of green felt, quilt batting, and an old rug to build on.
Build it:
- Lay the orange fleece over the rug and cut to shape, leaving a hand’s width overhang all round.
- Mark six vertical lines from spine to belly, evenly spaced over the barrel. These are the pumpkin segments.
- Slide a strip of batting under each line and stitch along both sides to create raised padded ribs. This is the step that turns a sheet into a pumpkin and it is worth the hour it takes.
- Cut triangle eyes and a jagged mouth from black felt and stitch them to one side only. A face on both sides looks wrong from every angle.
- Make the stem from green felt rolled around batting, stitch on a few curling tendrils, and tie it to a headpiece that sits well clear of the eyes.
The detail that makes it work: the padded ribs. Flat orange fabric with a face on it is a sheet. Ribs make it a pumpkin.
4. The ghost
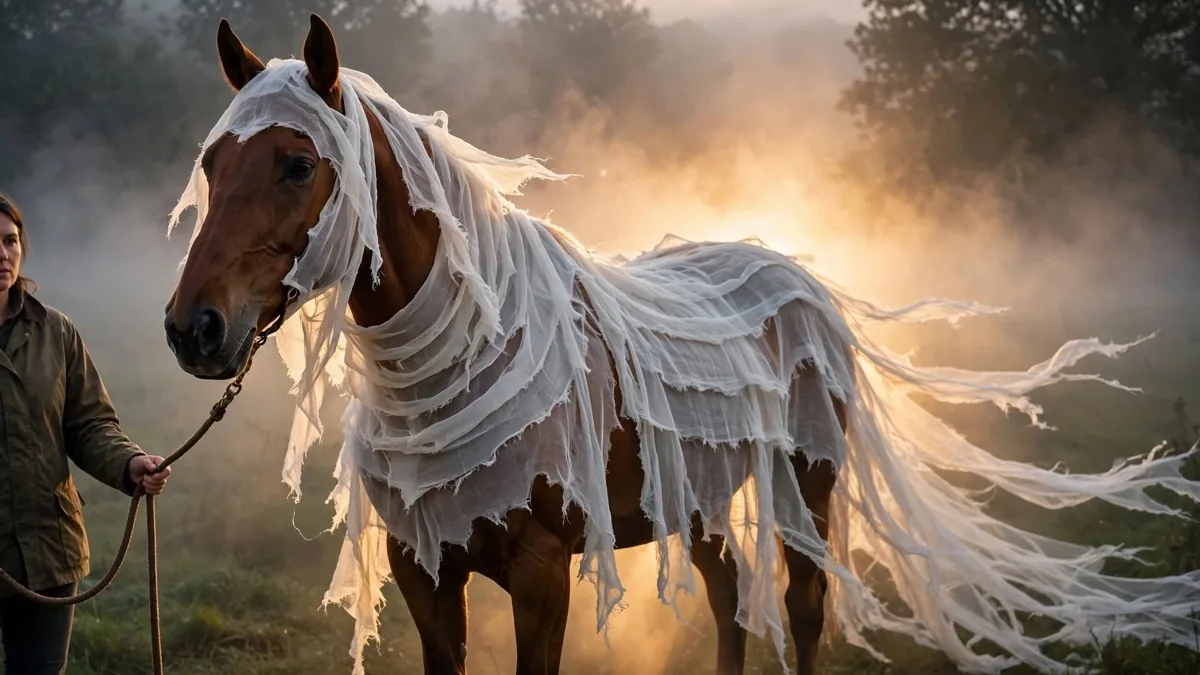
Build time 2 hours. Materials $20. Easy.
The cheapest costume here and, done properly, the most atmospheric. The trick is that a good ghost is not one sheet, it is many layers of torn ones.
You need: two or three white cotton sheets from a charity shop, several yards of cheesecloth or gauze, and scissors.
Build it:
- Tear rather than cut. Torn edges fray and move; cut edges hang dead.
- Cut the first sheet to fit over the neck and body, finishing above the knee.
- Tear the remaining sheets into strips of varying lengths, from six inches to three feet.
- Layer the strips over the base sheet in overlapping tiers, longest at the back so they trail into a train behind the hindquarters, finishing clear of the hocks so nothing reaches the ground.
- If you carry the gauze up over the poll, tear the openings wide, so that both eyes, both nostrils and the whole muzzle stay completely clear. Bought ghost costumes drape the face solid; do not copy them.
The detail that makes it work: uneven layers. A single draped sheet looks like laundry. Six torn tiers moving independently in the wind looks like a ghost.
Bought equivalent: Sleezy Barb Horsewear’s ghost horse costume at $152.95.
5. The medieval knight
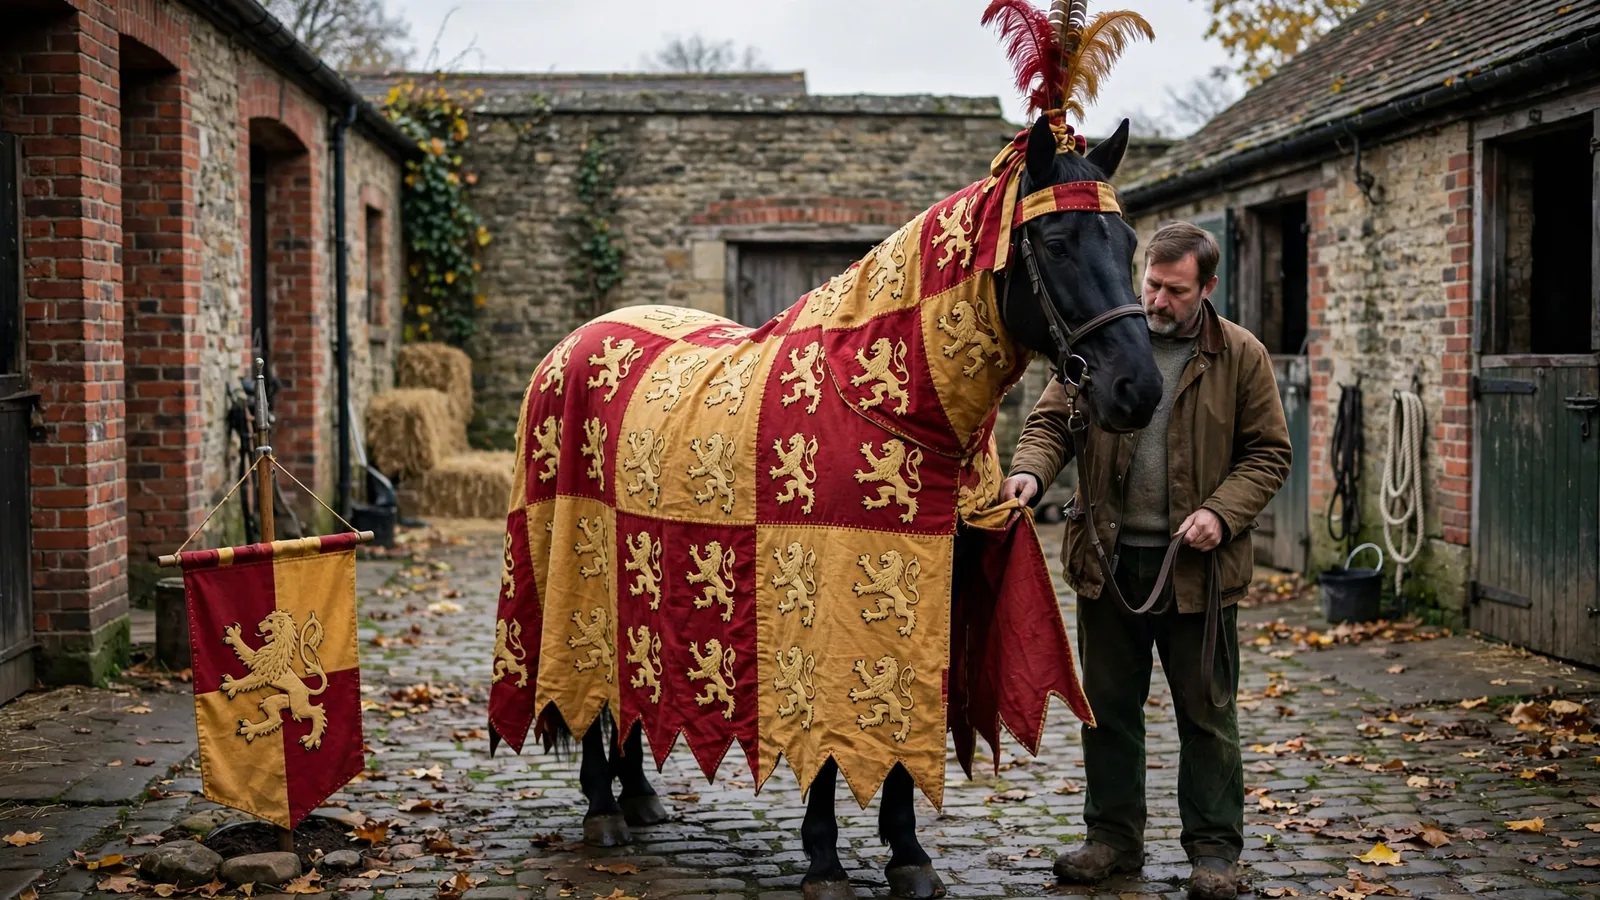
Build time 8 to 10 hours. Materials $75. Hard.
The most impressive thing on this list and the one most likely to win a costume class, because almost nobody attempts it.
You need: 4 yards of crimson fabric, 2 yards of gold, gold felt for the heraldic devices, fusible webbing, and a feather plume.
Build it:
- The garment is a caparison, a long drape that covers neck, chest and body down past the barrel. Cut it in four quarters, alternating crimson and gold.
- Cut a deeply dagged hem, a row of sharp zigzag points along the bottom edge. This single detail is what makes it read medieval rather than draped.
- Cut lion shapes from gold felt and apply them with fusible webbing, then stitch the edges. Repeat the same device across the quarters.
- Make a matching browband from the offcuts.
- Tie a tall feather plume at the poll, and plant a matching banner on a pole in the ground beside the horse rather than attaching it to anything.
The detail that makes it work: the dagged hem and a repeated heraldic device. Heraldry is about repetition. One large lion looks like a cartoon; six small identical ones look like a coat of arms.
Never attach a rigid pole to a moving animal. The banner stands in the ground or a groom holds it.
6. The lion
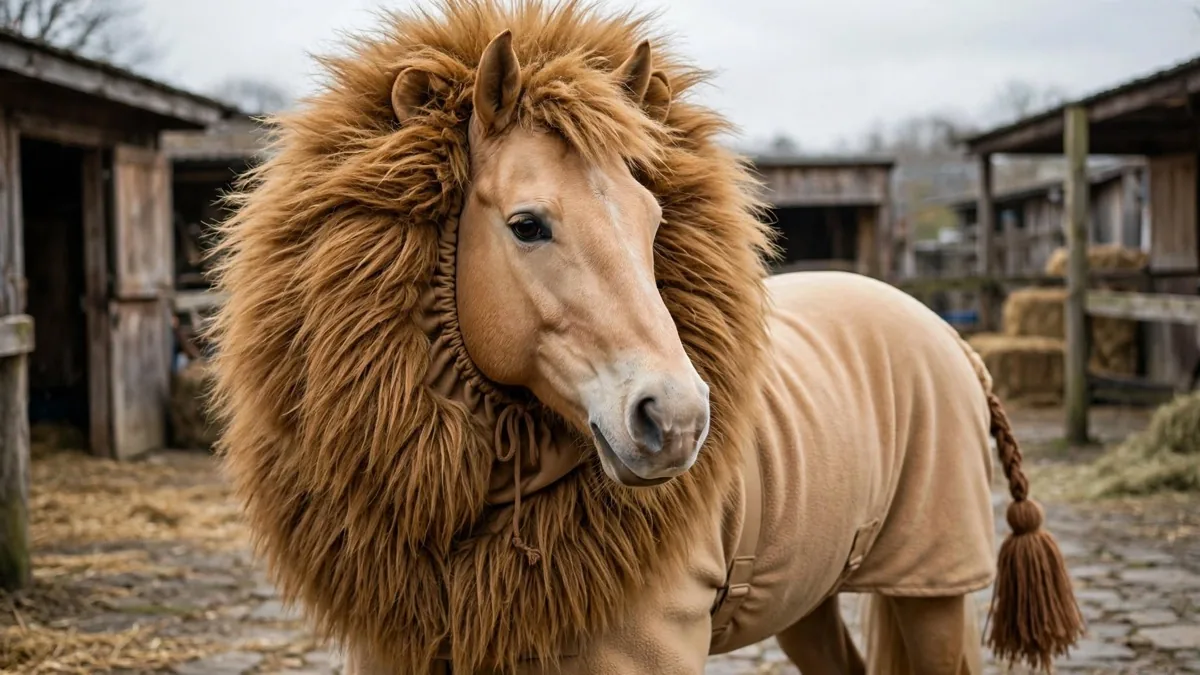
Build time 4 hours. Materials $60. Medium.
All the work is in one piece, which makes this far less daunting than it looks.
You need: 1.5 yards of long pile faux fur, 3 yards of tan fleece, brown yarn, and cord for a drawstring.
Build it:
- Cut the fur into a long rectangle roughly twice the circumference of the horse’s neck.
- Run a drawstring channel along one long edge and gather it hard. Gathering is what creates the density that makes a mane look like a mane.
- Tie it around the neck so the fur stands out and frames the face without touching the eyes.
- Cut the tan fleece to fit over the back as a plain rug. Resist the urge to paint shading on it; painted muscle definition is what makes shop costumes look synthetic.
- Cut a dozen lengths of brown yarn, bind them at one end and tie the tassel into the tail.
The detail that makes it work: gathering the ruff tightly. Loose fur lies flat and reads as a scarf.
Bought equivalent: Sleezy Barb’s lion costume with tail at $126.95.
7. The dinosaur
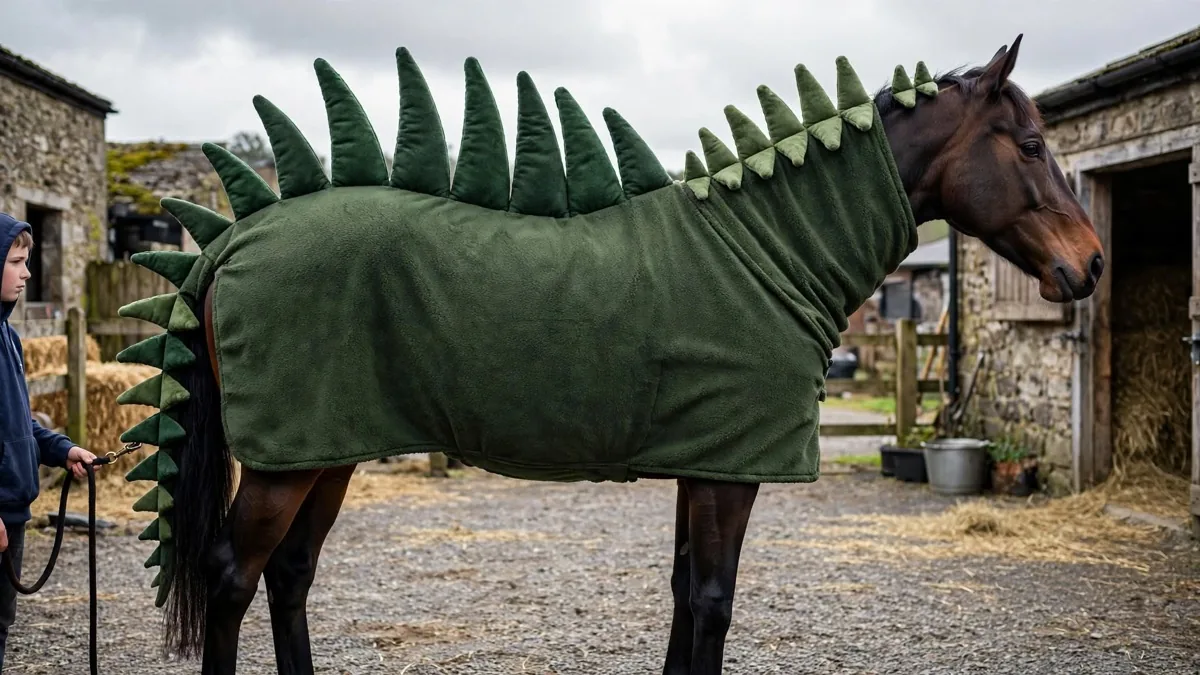
Build time 4 hours. Materials $40. Medium.
Two competing roundups feature a dinosaur, which tells you it lands. Most bought versions include a moulded head that covers the face. Leave it off.
You need: 3 yards of green fleece, a yard of darker green felt, quilt batting, and a rug to build on.
Build it:
- Cut the green fleece to fit over the rug, covering neck and body.
- Cut around sixteen triangular spikes from the darker felt, in two sizes, largest for the middle of the back.
- Stitch each spike into a pair and stuff lightly with batting. Light stuffing matters: fully stuffed spikes stand rigid and look like plastic, lightly stuffed ones flop slightly and look made.
- Stitch the spikes from poll to croup, graduating from small at the neck to large over the barrel and back down to small at the tail. A single line reads cleanly; a double row set slightly apart reads bigger from a distance.
- Leave the head entirely bare.
The detail that makes it work: spikes that flop. It is counterintuitive, and it is the whole difference between handmade and shop bought.
Bought equivalent: Slick Horseware’s dinosaur hood and tailbag at $139.95, or a full body version on Etsy at $239.95.
8. The dragon
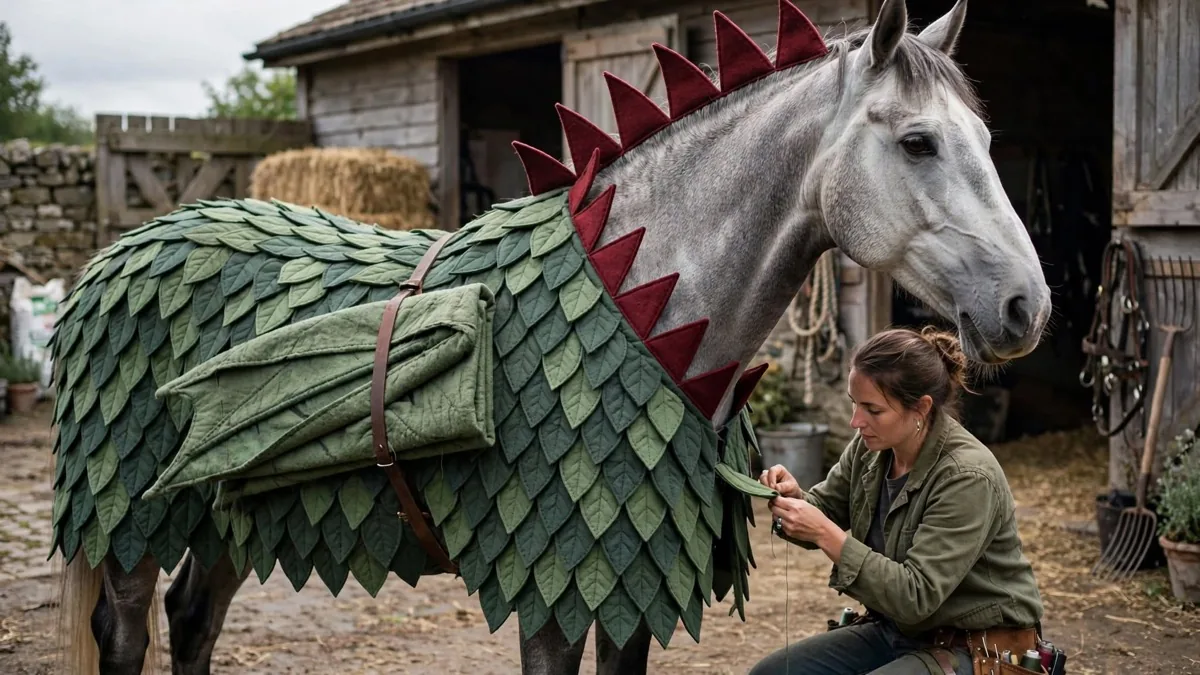
Build time 12 to 15 hours. Materials $85. Hard.
The most work here by a distance, and the best result. Budget three evenings.
You need: a quilted rug base, 2 yards each of two shades of green felt, dark red felt for the crest, and webbing straps.
Build it:
- Cut around 200 leaf shaped scales from the two greens. This is the long part. Cut them slightly unevenly; identical scales look machine made.
- Starting at the bottom edge of the rug, stitch a row of scales along their top edge only, so the bottoms hang free.
- Work upward in overlapping rows like roof tiles, alternating the two shades randomly. Each row covers the stitching of the row below.
- Cut a crest of tall red triangles and stitch it along the neck seam.
- Make the wings from layered felt and attach them with webbing straps behind the withers so they lie folded flat against the sides. Do not build them on a frame and do not spread them open. Rigid spread wings catch on doorways and look like scaffolding.
The detail that makes it work: stitching the scales along the top edge only. Free hanging bottoms catch the light and move as the horse moves.
9. The racehorse
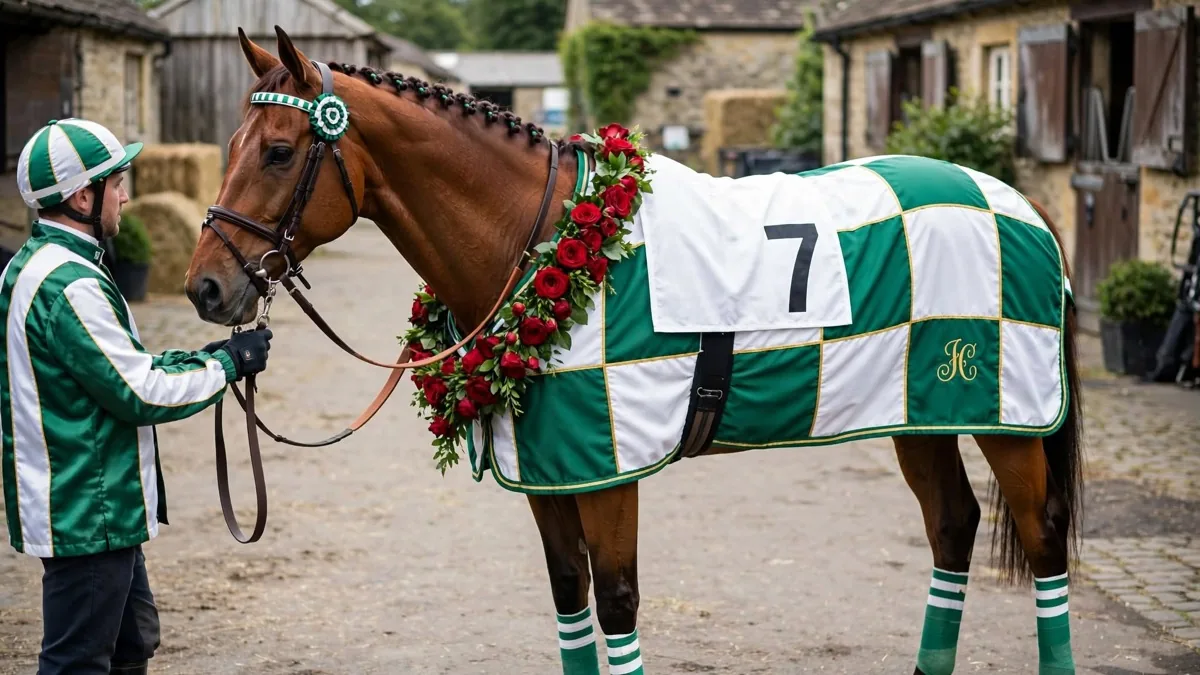
Build time 4 hours. Materials $45. Medium.
The costume that photographs best, because everything in it is a real garment properly fitted rather than a shape approximating one.
You need: fabric in two contrasting colours, white fabric for the number cloth, black felt for the numeral, and artificial roses.
Build it:
- Cut the body rug in large quarters or diamonds in two colours. Racing silks use bold geometric blocks, not patterns.
- Make a number cloth from white fabric and cut a large numeral from black felt. One digit reads better than two.
- Wire artificial roses into a garland long enough to lie across the withers.
- Wrap matching bandages in the same two colours on all four legs.
- The handler wears matching silks on the ground, with a silk cover pulled over a riding helmet.
The detail that makes it work: a real garland. It is the thing that says winner rather than runner.
10. The headless horseman
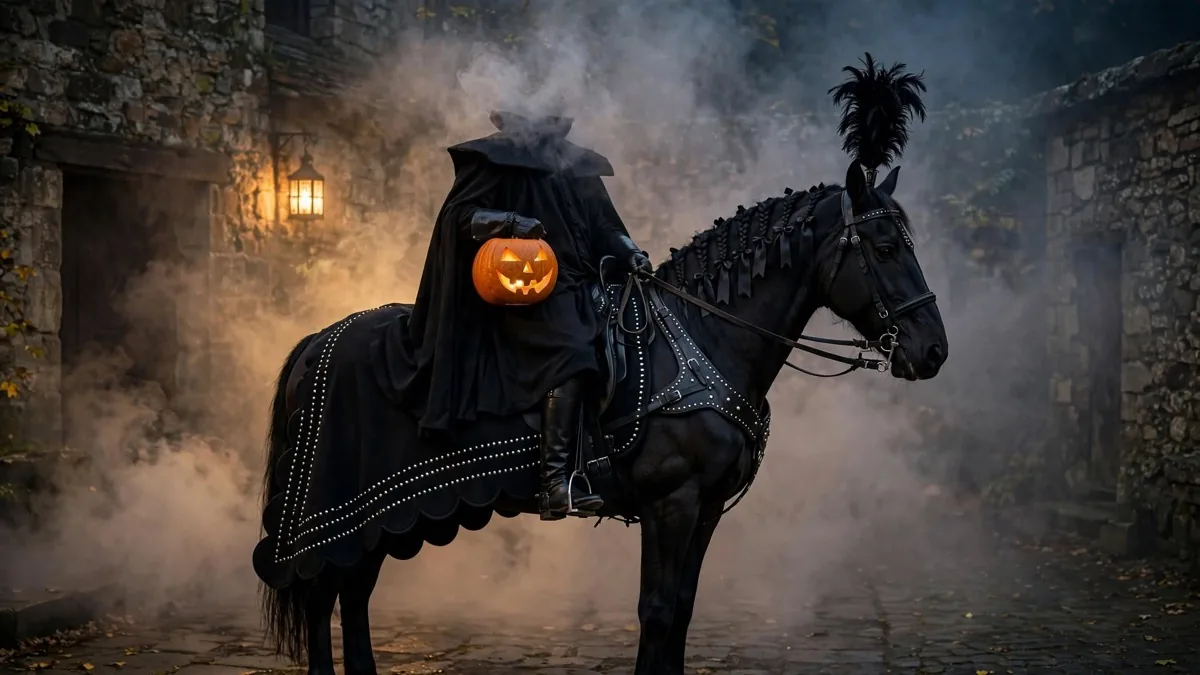
Build time 5 hours. Materials $50. Medium.
Almost all of this costume is on the person, which makes it the safest option for a horse that wants nothing to do with fabric.
You need: a black rug, silver upholstery studs, a heavy black cloak, stiff interfacing, and a carved pumpkin.
Build it:
- Cut a scalloped edge along the bottom of the black rug by hand.
- Press rows of silver studs along the seams. Studs catch lantern light and are what makes the rug read as barding rather than a plain rug.
- Build the cloak’s collar up on stiff interfacing so it stands well above the wearer’s shoulders and closes over at the front.
- Pad the shoulders out so the silhouette reads as a body with no head, not a person hunching.
- Carry the pumpkin at hip height, lit, and keep the other hand on the lead rope, or on the reins if you are riding in it. If you ride, build the shoulders up over a properly fastened helmet rather than leaving it off. That is how costume class riders do it, and the raised shoulder line is what sells the illusion anyway.
The detail that makes it work: the collar has to close over. An open collar shows a head inside and the whole illusion collapses.
Practise moving in the cloak before the event, on foot and mounted if you plan to ride. That is where this one goes wrong.
Three costumes under $20
Not everyone has three evenings. If you have an afternoon:
The ghost as above, using charity shop sheets. Around $20 and genuinely effective.
The skeleton in Vetrap only, no paint. A three roll pack is $12.96 and will cover one side of a horse adequately for photographs.
The unicorn without the bought horn. Braid the mane with ribbon, add fabric flowers, and make the horn from a cone of card wrapped in gold ribbon. Under $15 and the braiding is what people notice anyway.
Do horse shows have costume classes?
Many schooling shows and breed shows run costume classes around Halloween, and they publish their own rules about what may be attached to the horse and whether it may be ridden or shown in hand.
Read that show’s rules before you build anything. Restrictions are usually on anything obscuring the horse’s eyes, anything trailing on the ground, and anything that could come loose in the ring. All three are reasons the costumes above are built the way they are.
Two further things worth knowing if you are entering rather than just posting photographs. Classes are often judged in hand as well as ridden, so an elaborate build does not require a rider. And originality scores: the skeleton and the unicorn are the two most common entries at any Halloween class, so the knight, the dragon and the lion are where the open ground is.
What to build on
Eight of these ten costumes are built on a stable rug or cooler. That is the one item worth getting right, and the reason is simple arithmetic.
A single use polyester horse costume sells for $89 to $152 depending on the character, is unusable by November, and fits nothing properly because it is sized by character rather than by horse. A secondhand rug costs about the same, fits correctly because it is sized like real tack, survives being sewn onto, and is still a rug in January.
If you are buying a base layer, buy it preloved. Our guide to buying used horse tack covers the checks that matter on rugs and fastenings, and there are more options than most riders realise for buying used equestrian gear online.
That is the whole argument for building rather than buying. You are not really making a costume. You are borrowing from a wardrobe that already exists.
Frequently asked questions
What is the easiest horse costume to make? The ghost. Two or three torn charity shop sheets layered over each other, around $20 and two hours, and no sewing skill required. The skeleton is a close second if you use Vetrap rather than paint.
What are good cheap horse costume ideas? Ghost, skeleton and unicorn are the three cheapest, because the first two need almost no materials and the third works entirely above the neck. All three come in under $40 and two come in under $20.
Can you put a costume on a horse who has never worn one? Introduce it in pieces, in hand, in an enclosed space, over more than one session. Let the horse see and smell each item before it goes on. If the horse is still worried after two sessions, choose a costume that lives on the browband instead.
What costumes work best on a black horse? The skeleton, because white on black is the strongest contrast available and it is the reason that costume is a classic. The headless horseman and the knight also suit dark horses. The pumpkin, dinosaur and dragon all use a coloured base layer, so the horse’s own colour matters much less.
Are horse costumes safe? They are safe when the horse can see normally, nothing hangs below the knee, nothing rustles at the flank, and the whole thing comes off in one motion. Nothing should ever cover the eyes or muzzle, because that is where the horse’s only depth perception sits. Test at home before any event.
How long does a horse costume take to make? Between two hours and three evenings depending on which. The ghost and the skeleton are afternoon projects. The dragon and the knight are the serious builds, at twelve to fifteen and eight to ten hours respectively.
Before you start
Pick the costume your horse will tolerate rather than the one you want to photograph. Test it at home, in hand, before the event. Keep the head clear, keep everything above the knee, and make sure it comes off in one pull.
Then build it on something that was already yours. A rug you can sew onto, a browband you already own and an afternoon is most of this list.
And if you are shopping for the rider rather than the horse, our gifts for horse lovers guide is a better place to start.
Sources: equine field of view and blind spot figures from published equine vision references, approximately 350 degrees total field with 65 degrees binocular and a front blind spot extending 90 to 120 cm. Material prices checked October 2026: craft felt $5.50 to $12.25 per yard, anti-pill fleece $5.99 to $17.99 per yard at Joann, 3M Vetrap approximately $4.66 per roll in a six pack. Ready made costume prices as listed by Sleezy Barb Horsewear, Slick Horseware and Etsy sellers, October 2026.


